
Hi Yakkers!
For those of you who may be looking to see a bit more info from your GPS, I've written up a guide on adding your data into Google Earth for a spiffy satellite image showing tracks and/or waypoints. I'll also detail how to extract your data to distribute to others for fishing reports etc. This information is useful to include in our trip reports not only for our reference, but also for visitors to the site so they can see where we go and what we get up to (if you wish to show them). Of course, if you want to keep this info secret you can still download the data and use it for your own reference or to show trusted friends.
NOTE: I am using a Garmin Etrex10 and Windows 7 for the purposes of this write-up. The method may be slightly different with your model of GPS or PC, but the basics should be the same. I will refer to Google Earth as GE for the rest of the article.
GPS
GPS configuration should be fairly standard across all models bought in Australia. Most of you will have configured your GPS already, but I'll review the main settings you need to worry about. The first is the position setting which needs to be in degrees and decimal minutes format (displayed on my GPS as hddd°mm.mmm') found in the "Setup" and then "Position Format" menus on my Etrex10. Under the same sub-menu is a "Map Datum" and "Map Spheroid" setting. These both need to be set to "WGS 84".
The other GPS setting I use is the automatic tracking feature. When your GPS is switched on tracking begins and continues while it’s in use. All you need to do is make sure the previous track is cleared otherwise it may become part of the new track. Clearing a track can be done from the "Trip Computer", sub-menu "Reset", and the automatic tracking setting can be found in "Settings", sub-menu "Tracks". You don't need to use automatic tracking, but it simplifies things once you're on the water. You will also need to save your track once completed. You can find this under "Track Manager" > "Current Track" > "Save track". Note that the GPS will continue to track whenever it’s turned on, so if you wish to create a track showing only where you travelled “today”, you need to delete the previous track at or before the time you turn on the GPS at the start and then preferably save the track at the end before turning the GPS off. If you leave the GPS on, it will continue to track with the result that your recorded track will likely show the route to your home as well as where you went fishing.
There are more settings on a GPS than you can comfortably poke a stick at, so it pays to play around and see what yours can do. I'll update this article if I come across anything else worth mentioning, but for the moment these basics will suffice.
GOOGLE EARTH
If you don’t already have GE installed, go here and download GE. Install the program, making sure your computer has at least two gigabytes of free space on the hard disk. GE creates a cache for recently used data, and it can fill up fairly quickly.
With GE installed, there is one option that must be changed before we can start using it. If you open GE you will find a menu bar along the top. Find the "Tools" menu, and then select "Options" from the drop down menu it produces. You will be presented with the following dialogue box:
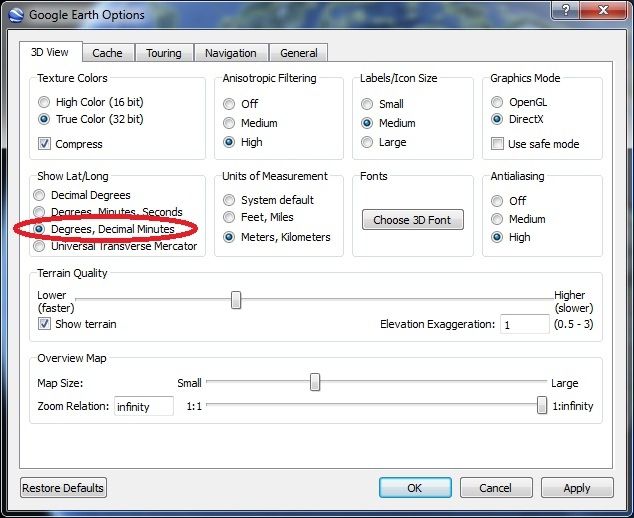
The image has a red ellipse around the "Show Lat/Long" option for "Degrees, Decimal Minutes". You will need to select that option if not already selected. This is to keep a data standard for our Noosa Yakkers reports etc, and matches the setting in the GPS as described above. The "Local Marks" page on our blog here already makes use of this standard. Using a different option may put your data out by a few kilometres!
The other areas on the GE options dialogue box are largely personal preferences. The only things I would point out are the Antialiasing and Antistropic filtering options. Make use of those only if your computer system has a high performance graphics card, as you may experience some performance degradation when using GE without the better card if you select these options.
IMPORT FROM GPS
Now you can start importing data from your GPS. When plugged into the PC, using a cable connector, most GPS should appear as another storage device on your system, like a USB memory stick or CD-ROM drive.
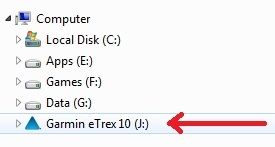
Here Windows has assigned the indentifier “J” to the GPS after connection to the PC.
GE has the capacity to import all data automatically from Garmin, Magellan, and Wintec devices, but I would recommend against using this automatic option as I have found it unreliable. We'll start with the waypoints.
WAYPOINT IMPORT
NOTE: The following process assumes you have already entered the relevant waypoint information into your GPS. At a minimum you should have the coordinates for our regular destinations like Jew Shoal, Halls Reef etc (see here but note that this process will allow you to selectively import all waypoints recorded on the GPS, including those newly created on this trip (see image further down).
In GE, go to the "Tools" menu and select "GPS". You will be presented with the following screen.
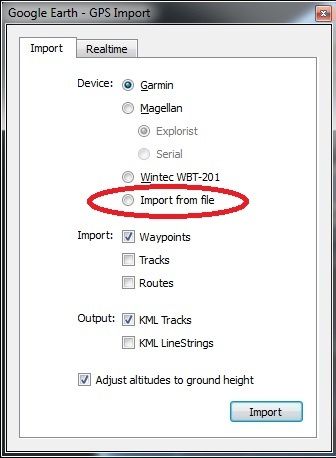
Select "Import from file", tick the box for "Waypoints", and click "Import". You will now be prompted to select a waypoint file to import from. The saved file path for waypoints and tracks on my Etrex10 is "x:\Garmin\GPX", where "x" is the letter identifier assigned to your GPS automatically by Windows (in this case, the GPS is identified on my computer as device “J”). You need to navigate to the device (ie the GPS, in this case, device “J”) in GE/Windows Explorer and then select the file.
The files are named for easy identification as either a track or waypoint with an attached date of creation. Select the waypoint file you would like to import and click "Open".

The waypoints will now appear in the sidebar on the left under "Temporary Places" > "gpx GPS Device" (or similar) > "Waypoints". Within this menu you can delete unwanted imported waypoints prior to copying them into your working data area. Once you are happy with the waypoint data you wish to import, perform a right mouse button click on the "Waypoint" heading and select "Save to My Places" from the context menu that pops up.
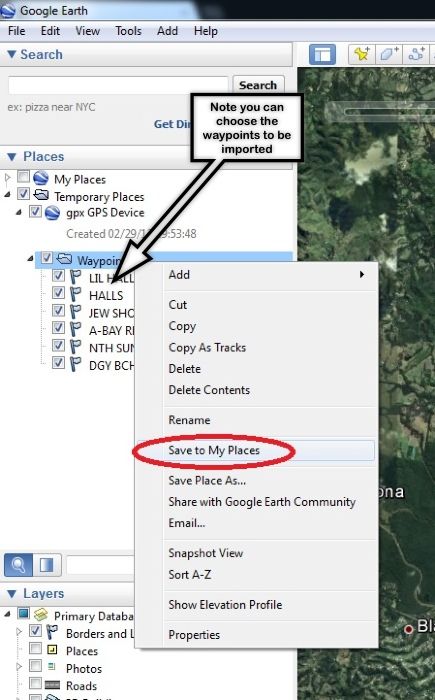
The waypoints will now appear under the heading "My Places" at the top of the sidebar in GE.
TRACK IMPORT
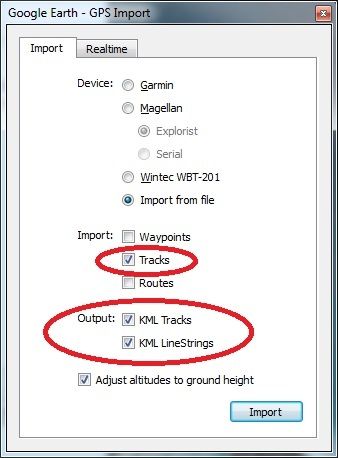
Importing tracks is largely the same as the description for waypoints above, but instead of selecting waypoints when importing from the GPS, choose to import "Tracks", and output "KML Tracks" and "KML LineStrings". The file you need will have "Track_
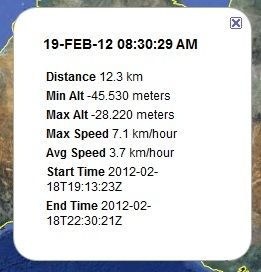
In the sidebar, in the same place where the waypoints appeared in "Temporary Places", you will now find "Tracks". In here you will find two dated tracks matching the file name you imported. One will have sub-folders (click the triangle next to it) containing "Points" and "Path", and one will not. The track without a sub-menu is a basic path of your trip, and is the track you will most likely use if you want to produce a quick image of your journey. The second track is where the guts of your trip data is contained (altitude, time stamps, direction, speed etc). If you click the blue "link" style heading for that track in the sidebar, it will popup a window over the map displaying track information.
Let's leave the complicated track for now (it has useful info, but we'll get to that another time), and focus on getting an image of our track. If you want to, you can also save these tracks to "My Places" as you did with the waypoints.
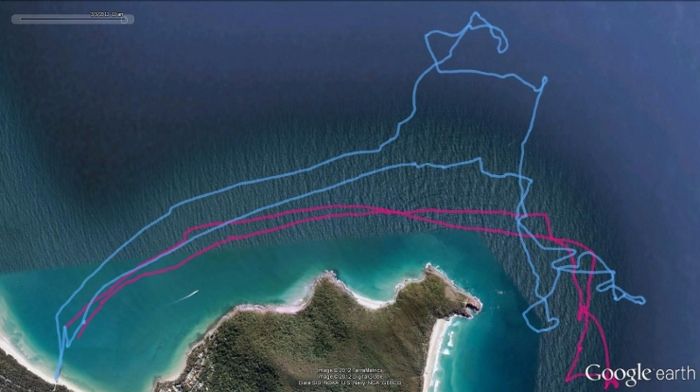
Double click your track in the GE sidebar on the left. The map window will now zoom to your track and magically display the track centered on screen. Tick the boxes in the sidebar to display or hide any relevant waypoints near your track if you desire (locations, fish captures etc). You also have the option to make this map slightly larger by turning off the toolbar, sidebar, and navigation menus from the "View" menu at the top left of the screen. I recommend removing the navigation menu at least, as it will appear on your image otherwise. Go to the "File" menu at the top left, select "Save", and then "Save Image". Give it a name and you're done! If you're planning to use it for trip reports it will need to have a maximum width of 700 pixels, so a bitmap editor will need to be used to crop the image and tidy it up. This is something Sunshiner has covered on the blog already here.
After all that you should now be able to produce some colourful images of your adventures on the water. If you're writing a trip report, maybe grab the GPS data from your trip-mates (who can email the track files to you) and produce an image with multiple tracks for added effect! Be creative and have some fun out there... the first 5km wide smiley face overlaid on Laguna Bay wins a prize.
Cheers
Matt (gemini)
A thoroughly enjoyable read. Opens up all sorts of possibilities.
ReplyDeleteThanks gemini.
Harv.